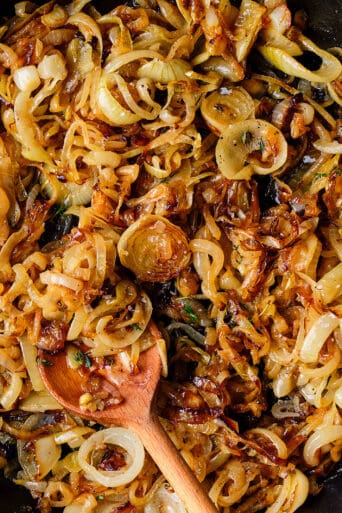
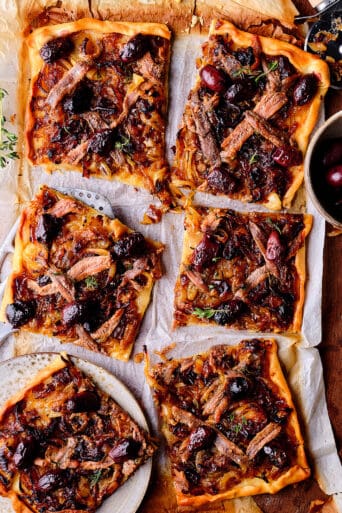
The perfect crust – part 2 of workshop by Tartelette
How fitting don’t you think that we were pointed to the perfect crust recipe by the lovely Helene from Tartelette blog. Could there be anyone more suited to giving us the ultimate recipe? The recipe itself comes from the gorgeous book Tart Love: Sassy, Savory, and Sweet A book for which Helene made all the photos. I couldn’t resist and bought the book straight away and it is now on my bedside table as I am going through it page by page. You might want to give it a try too as it is definitely worth it!
On the second day of our workshop we spend the morning creating the pastry for our tarts. Now pastry and in particular short crust pastry is one of those things that I have attempted before but it somehow never came out completely right. I put the dough in the fridge and it would come out rock solid. Or it would be ok but after baking it was just unappetizing and too tough to chew on. It’s not the recipe I would think as that is usually pretty straightforward.
So for me getting the perfect crust was always a bit of a mystery. Until now that is. Good flour comes first ofcourse (which is possibly also part of my problem), then the warmth of the dough is crucial too. Too hot and it will not work. Your butter has to be very very ice-cold, the water you use has to be icy cold too and if you’re hands are too warm (like mine are apparently) you might want to consider using a machine instead. Ofcourse at the workshop we didn’t have 12 foodprocessors so we kneaded the dough by hand. It soon became clear that my hands are too warm so the butter is melting too quickly. You want the dough to have a crumbly texture, you do not want it to form large clumps. So back in the fridge my dough went and I can safely say that it did not suffer any side effects…
After making the dough it has to rest for at least 30 minutes in the fridge before rolling it out and processing it further. This gave us enough time to think about our fillings and how we would be styling the tarts after baking. Our assignment for the afternoon was shooting our own tarts. Since we would also be eating them in the evening, flavor was important too. I chose to make three different fillings; one with courgette and asparagus, which you see above. one with blue cheese, radishes and tomatoes (that is the first pic shown in this post) and one with a mixture of the two. My egg filling for the pastry was seasoned with chives, pepper, salt and some fresh parsley.
As for styling our tarts; it was funny to see the difference between the various people in the group. Some went for a more elaborate styling setup and I kept it fairly simple as you can see. My background is the baking tray they were baked on as I totally loved the structure of the old trays. I did struggle a little bit with how to style them in the beginning and well, let’s say I made some interesting mistakes there, which were quickly guided in the right direction by Helene…
I will be sharing the recipe here for the crust so you can recreate it at home!
The perfect crust
Makes enough for 2 large tins or 8 small ones
Ingredients:
- 2.5 cups (310 gr) all purpose flour
- 2 tsp sea salt
- 2 sticks (8 oz) unsalted butter, chilled and cut into 1/4" cubes
- 3 tbsp ice-cold water or just enough to hold the pastry together
Directions:
- At least 30 minutes before rolling and baking (or up to 1 day in advance) prepare the pastry. In the bowl of a food processor, fitted with a plastic blade, pulse together the flour and salt. Add the butter and pulse rapidly, about 40-50 times, or until the butter is blended into the flour and is coarse and the size of small peas.
- Gradually add the water in a small trickle, with the processor running. Continue adding just as the pastry starts coming together in the shape of a loose, crumbly ball.
- Turn out onto a lightly floured surface. Form into a disc, about 1" high, and wrap tightly with plastic wrap.
- Refrigerate for at least 30 minutes or overnight.
Notes
When forming the dough by hand, knead with your fingertips until you have a crumbly texture. If you find that the dough comes together too fast, put it back in the fridge and chill for ten minutes before proceeding. Always make sure your butter is well chilled and hard Don't use simply cold water, make sure it is ice-cold!
Recipe by Holly Herrick


Appetizer
Asian
Bread
Breakfast
Desserts & other sweets
Healthy
Indeed, this crust looks amazing! So flaky and buttery.
Cheers,
Rosa
[Reply]
Simone (junglefrog) — July 31st, 2012 at 10:40
Thanks Rosa. Yes it was flaky and buttery allright. I can’t wait to start making more of them!
[Reply]
A perfect crust and so stunning pictures, Simone! Congrats on that awesome work!
hugs, Sandy
[Reply]
Simone (junglefrog) — July 31st, 2012 at 10:40
Thanks so much Sandy!
[Reply]
Beautiful photos and pies. I would love a slice of each.
[Reply]
Simone (junglefrog) — July 31st, 2012 at 10:39
Thanks Norma!
[Reply]
What? No reference to the trash bin display? LOL!!! Thank you for that….
Thank you for these posts Simone. It was truly an honor to have you at the workshop. May I say I was a bit intimated to have you as one of the attendees? Yep. It’s not like you don’t know your way around a camera so yes, it was a huge privilege to share that weekend with you and I am glad you took away so much from it. Thank you for being as wonderful as you are. Truly mean it! Now we must co-host
[Reply]
Simone (junglefrog) — July 31st, 2012 at 10:38
It was so much fun meeting you Helene and can’t wait to do the co-hosting next time! And yes, I thought about including the trash bin photo but then thought mmm, maybe not..lol
[Reply]
I love Holly Herrick – I have gotten to know her through social media and she’s friendly, generous and adorable. I am putting this book on my wish list. And, Simone, not only do your tarts looks scrumptious and beautiful, but I love your styling! You know I prefer simplicity over fussy and these are perfect! Gorgeous!
[Reply]
Simone (junglefrog) — July 31st, 2012 at 10:37
Thanks so much Jamie. I didn’t know Holly Herrick before but her book is just awesome!
[Reply]
I had to laugh at you warm hands
) better than having constantly cold ones like mine! Seriously the tarts look lovely as does the styling. I would love to have gotten my hands on the tray – did it come back to Holland with you? Enjoying reading about your Ireland trip. Keep it coming!
[Reply]
Simone (junglefrog) — July 31st, 2012 at 10:37
I know! I wanted to take that tray back with me but mmm I guess too many people wanted to have the trays which would have left the cookery school without any.
I do think I might have found a source for similar ones in Holland though!
[Reply]
That crust looks amazing, especially against that baking tray. If you hadn’t said that was your background I’d have no idea because it’s gorgeous.
[Reply]
Simone (junglefrog) — July 31st, 2012 at 10:39
It is, isn’t it? I now so have to get myself one of those really old baking trays! I’m sure a lot of people just throw them away not realizing what they have on their hands…
[Reply]
Simone – these look amazing (as expected!). I cannot thank you enough for all of your invaluable advice over the 4 days of the workshop. Let me know when you’re heading through Dubai!
[Reply]
Simone (junglefrog) — July 31st, 2012 at 18:15
I will definitely do that Dana! Not sure if it is going to happen this year but you never know!
[Reply]
Stunning even fabulous pictures, dear Simone! I love this pastry recipe crust a lot!
The asparagus tarts look so appetizing & delectable too!
[Reply]
Simone (junglefrog) — August 1st, 2012 at 07:50
Thanks Sophie! It was very tasty too!
[Reply]
Thank you so much for your words about Tart Love! My goal was to help people feel comfortable with making pastry and have fun with it, so if I accomplished that, it makes my day. I’m sure you had a wonderful time at the workshop with Helene. Beautiful photography, too! Sincerely, Holly
[Reply]
Simone (junglefrog) — August 1st, 2012 at 07:50
Thanks so much Holly! Yes you certainly accomplished that task as I have always struggled with pastry and now it just all seems to click. Loved the structure and taste of your pastry…
[Reply]
Simone,
This tart looks delicious. I like your writing, you are really inspiring me to take some good photos with my limited accessories.
[Reply]
Simone (junglefrog) — August 2nd, 2012 at 23:31
Glad to hear that Swathi. Ultimately it is not about the tools but it is all about the photographer!
[Reply]
The tarts look wonderful.
[Reply]
The tart looks wonderful.
[Reply]
Lovely to see your photos and a pleasure to meet you!
[Reply]
When I first learned to make pie dough as a teen..I used to throw everything in a food processor and of course, over process it. Rock pies and tarts! I was glad to finally learn that the dough must be a raggedy mess with lumps of butter before wrapping and going into the fridge. I mostly make my pie crust by hand now..it always turns out better that way. It’s the touch of ‘love’ in my opinion. Your tarts look incredible, Simone! What a great workshop..hope I can attend one soon!
[Reply]
Simone (junglefrog) — August 5th, 2012 at 16:54
I am sure I have made the same mistakes in the past. I thought it needed to be processed more then anything. But then what did I know? Nothing apparently! With a non-cooking mum growing up it has been steep learning experience..
[Reply]