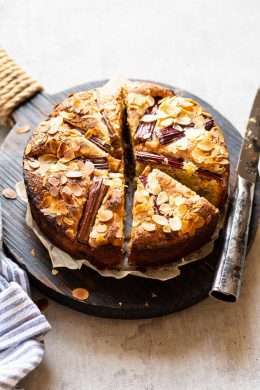
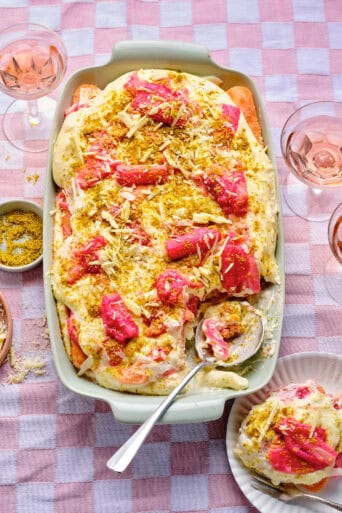
Previous post:

Next post:

Foodphotography;shooting at night or in low light

by Simone (junglefrog) on January 21, 2010 · 35 comments

in Howto's, Photography

Pin It

Taken with two small halogen lights

For today’s post I am gonna try and explain how you can solve some of the problems that occur when shooting in low light or at night. Especially at this time of year it seems to be impossible to shoot your dinner in daylight since, well, most people don’t eat their main meal during lunchtime right? And while certainly not impossible; shooting at nighttime does create some problems and most have to do with the fact that artificial light has a different color as natural daylight.

So in order to explain you how to shoot during the evening you have to know that each type of lamp, whether that be a regular bulb, halogen, fluorescent light etc. has it’s own special color temperature. Daylight itself can vary in color during the day; early in the morning the light is bluish, while later in the day it becomes more warm and yellowish. And again that varies in each season. The color of the light is generally referred to as degrees Kelvin. I won’t get all technical here but as a rule keep in mind that daylight is generally around 5000K (as in Kelvin). A flashlight is daylight balanced at 5500K, which is why when using flash, the colors in your photo tend to be correct. Colortemperature in photography is generally referred to as white balance.

But as we all know flash is just too harsh and unattractive in general. I forgot to take a photo with flash while doing the other shots so it looks slightly different than all the other photos but you’ll get the picture. Very unattractive!

Direct flash vs indirect flash (via the ceiling) on the right

Even with flash there is a huge difference between direct flash which is the left photo or indirect flash, which is the photo on the right. Here I bounced the light of the ceiling, but this is ofcourse only possible if you have an SLR with a separate flash with a swivelhead. There are trics if you don’t have that but that is maybe more for a separate topic. For now we will focus on regular lights you might have in your home.

I started this excercise of with taking a photo without any light. I did shoot all of these during daytime but I have curtains in the studio that make it virtually nighttime, so trust me when I say there was no daylight coming in. This will not work at night because if it is pitchblack you’ll be waiting forever until your photo is taken. In this case I had to wait 30 seconds for the exposure to finish (needless to say that you cannot do this without a tripod!)

Left original from camera, right corrected with greycard

As you can see the original on the left is very orange and has a red tint. I am guessing this is due to the fact that my curtains are some kind of beige so the little light that was coming in probably cast a weird color. I shoot in raw – always – and have used a

Grey card

greycard to correct the whitebalance afterwards. A greycard is nothing more then a card which you position in your scene and then take a photo in the same light conditions as your actual photo and let’s you adjust the while balance later in software.The reason for using a ‘greycard’ is that it represents an average neutral.

Keep in mind that you can only do this properly if you shoot in raw! (which I would strongly urge you to if you have an SLR and difficult light situations. If you don’t have an SLR you can try the manual whitebalance instead, which some, not all, compacts have. To use the custom white balance you take a photo in the same situation as your final shot of a white sheet of paper. You set your camera to custom white balance and it will ask for a reference point. You look up the photo of the white sheet that you took (make sure it shows nothing else but the white sheet) and select that. For all photos now taken in the same light situations your camera will remember that setting and adjust the whitebalance accordingly.

I have shot all photos here except the flashphotos with exactly the same setting on a tripod.

If you do own an SLR I would recommend you get familiair with shooting in raw. It’s not as complicated as you might think but it can save your photo in situations like this.

After taking these shots without any additional light I used small halogen lights. They were small tiny lights so if you want to use those diffusing the light might make the shadows less harsh but I actually liked the effect they gave so I kept them as it. I will first show you a photo of the setup and the lights that were used.

Lighting setup with two halogen lights and foamboard reflector

As you can see very simple. I used the mirror in front to decrease a little bit of the heavy shadow on the first mandarin.I started by using one light which is the first photo below, but liked it more with two lights

And this is the end result; first on the left the uncorrected version, then the corrected version and then the version with two lights.

From left to right; with one light uncorrected, with one light corrected and with two lights corrected

In case you were wondering; the tablecloth is light blue. :)

As you can see in the background on photo two; the light becomes in general much bluer when corrected (again I did this with a greycard) and because there is now a big difference between the light in the front and the light in the back I preferred the two light version where you cannot see the background behind it anymore. But the results are quite acceptable I think.

So then I went on to use a building light or construction light, not sure how you would call them in English but they are the kind of lights that are used in general on building sites. One of the (big) disadvantages with these lights is that they become scorching hot, so unsuitable to use if you have little kids running around. I wouldn’t go for these but they are cheap and they work too.

Again first a photo of the setup with one light; I ended up using two lights in the last photo of the series.

Building light or construction light

The photos I took are again from left to right; uncorrected, corrected and with two lights.

From left to right; no correction, corrected and with two lights

As you can see the light without correction was quite yellow and very easy to correct with the use of a greycard! Because I was in the studio I did not have any regular lightbulbs but essentially the technique would be exactly the same, wether you use fluorescent or whatever lightsource. Just make sure you do not use different kinds of lightsource as that will make it almost impossible to correct for the right colortemperature. So always use sure that you use two of the same light sources if you use two. For reflective material I used cheap foamboard to lift the shadows a tiny bit. You can always also use little mirrors if you want to light up certain parts of your image or give something a little shimmer.

Last is a daylight balanced light which are not that expensive to buy if you want to.. It makes it easier to handle if you shoot with a compact or always shoot on jpeg (and don’t feel like using raw) You can buy small light such as the Lowel Ego Lights, which are great to work with or any other kind of brand really. I have Interfit which I don’t know if that is English or Dutch, but regardless of which you use make sure they are daylight and not anything else.

Daylight lamp

Even with a daylight lamp you might still have to correct a little bit. Make it a habit to use your greycard as that can make a huge difference! Below the results with the daylight lamp. I had only one so can’t show you how it looks with two, but as you can see you don’t really need two to get good results. I have one in the studio and one that I use at home when I want to shoot something in the evening. As you can see the lights have a wider area making the lift softer then a pinpoint light such as the little halogen lights. But ultimately it depends on what kind of effect you want to achieve.

Because there was really little difference between before and after light correction for the daylight lamps I thought I show you one taken with the daylight lamp (on the left) and one taking with studioflash (on the right) Really not that big a difference. The shadows are a little softer but that’s about it.

On the left daylight lamp and the right studioflashes

As you can see it is very well possible to shoot at night with results that are as good as shooting in daylight and the good news is that you do not need very expensive equipment to do so. It does help if you own an SLR and get yourself familiair with shooting in raw and using a greycard or custom white balance, but even with a compact you can achieve good results or maybe I should say better results that shooting with flash. With any kind of light you have to pay attention to how the light falls on your subject  and where it creates shadows. Daylight usually comes through a large window and is by that alone softer then articificial light but if you use that to your advantage there is no reason why you cannot take good photos in the evening.

Good luck and let me know if you have questions!

Related posts:

Related Posts:

{ 34 comments… read them below or add one }

lisaiscooking January 21, 2010 at 16:37

Great information here! This makes me wish I had a studio, but the principles could definitely be applied at home. Thanks for the tips!

Reply

Esi January 21, 2010 at 16:43

These tutorials are so helpful! Keep them coming.

Reply

Pei-Lin January 21, 2010 at 17:11

Dear Simone,

Thanks a million for sharing the knowledge, especially for a photography noob like me, this is a great help!! Really! I just briefly skimmed thru. Am so gonna look at it in details this weekend. Gotta work tomorrow! =)

I love your blog! So cheerful! Keep it up!

Reply

Taga_Luto (Pia) January 21, 2010 at 17:52

Thank you, thank you! I truly appreciate that you’re sharing your knowledge w/ photography. I can’t wait to follow your tips. I need a trip to lowe’s asap.

Reply

Nurit - 1 family. friendly. food. January 21, 2010 at 18:10

Great tips. I put the link to your post on Twitter. I’ll also mention it in my next food photog post :)

Reply

Kathy from healthy-happy-life.com January 21, 2010 at 19:06

Wow such a detailed post. I am a self-taught food photographer, so these types of posts always intrigue me. I love your experimental approach. Thanks for taking the time to post such a wide variety of photos. AWESOME!

Kathy

Reply

Miriam/The Winter Guest January 21, 2010 at 19:16

Mmmm, raw format… I’ve got to try again, because the thing is that my current software doesn’t open raw…

Reply

Sarah G January 21, 2010 at 20:14

This is so helpful and informative. Thank you for all your effort. I can hardly wait until I am in my own home and can set up for better pictures.

Reply

Asha@FSK January 21, 2010 at 20:29

Fantastic post!!! Thanks so much for all this information. I don’t yet have an SLR, just a basic point & shoot (canon A590)..It takes sad pix in low light, so I have been forced to change my cooking routine..lol.. Am gonna see if it’ll allow me to change the white balance as you suggest.. That will make me (more imp, the hub,lol) so much happier!!! :) ))

Reply

Neel | Learn Food Photography January 21, 2010 at 20:39

Wonderful information. There is so much to explore on the subject of lighting and you have covered some wonderful basics/not so basics too :) .

I found several things helpful
• White Balance is the most critical piece in lighting. Adjusting it is simple (in DSLRs) and many don’t know about it.
• Curtains, boxes and other things change the color and provide the tint which is not so good for color.
• It is important to figure out what kind of light you are using (daylight bulbs versus softlight versus some other kind). or it will mess up the color.

Just few things that I observed.

Thank you for sharing this with us.
Neel from LearnFoodPhotography.com

Reply

Monica January 21, 2010 at 20:40

Having just started a food blog, and need all the help I can get in improving my food pictures and now that it goes dark early in the afternoon I needed a solution to bring the “fake” daylight in. I been reading in how to make light boxes and using lights and here you come along with these great tips! I’m so excited to try them out and see the results, which I’m SURE will be 1000 times better than what I’m doing now.

Thank you!

Reply

Trissa January 21, 2010 at 21:46

As usual, your detailed instructions/lessons are fantastic – please continue to give us more tips. I wish I had read this before I did my post! LOL!

Reply

Valérie January 21, 2010 at 22:26

This all such great advice! It’s so wonderful of you to take the time to teach the rest of us! Thank you!

Reply

Peter G @ Souvlaki For The Soul January 21, 2010 at 23:43

Simone these are great tips…I’m not really familiar with artificial lighting. This has been a great help.

Reply

peachkins January 22, 2010 at 00:17

Thanks so much! very helpful tips!

Reply

Hannah January 22, 2010 at 20:53

Awesome post, I love seeing the direct, side-by-side comparisons! This is very helpful information, as it’s such a pain to have your photography limited by the whims of the weather and time of day.

Reply

Kate at Serendipity January 23, 2010 at 21:22

Simone, thank you for this post. I’ve been playing around with my flash and this is EXACTLY what I need right now. I’ve bookmarked this…

I’m not sure what you do with the graycard after you shoot the photo. How does it help you with your white balance? I sometimes use a piece of white card in a corner I can crop out, and use that as my white. Is this the same idea? Where do you get the graycard?

Reply

anncoo January 25, 2010 at 03:32

Thank you for sharing these great tips :)

Reply

Soma January 25, 2010 at 04:04

So helpful Simone! Bookmarked.

Reply

shirley@kokken69 January 25, 2010 at 11:44

Hello, I have often popped by your site for your generous instructions on photography. Today’s article is especially useful. The part about white balance is really informative for me. I shall try it out next time…

Reply

deana@lostpastremembered January 25, 2010 at 15:55

How very kind you are to share your knowledge.. it was really well done and I can’t wait to use your ideas. Great to have found your blog…of course, the photos are great!

Reply

Memoria January 27, 2010 at 08:20

Did you show the studio flash? Is that the external flash for the camera?

Thanks for the very informative tutorial.

Reply

shaz January 27, 2010 at 09:35

Thanks so much for sharing all this information. It’s so frustrating taking night photos (using a compact!), but I am definitely going to invest in some lights now. Cheers :)

Reply

Christine @ Fresh Local and Best January 27, 2010 at 17:12

I learned so much in from post on lighting and the grey card. While I am still a novice, and have much to catch up on before I get to shooting raw, I am looking forward to revisiting this post when I am ready. Thank you so much for writing such a detailed post on this subject!

Reply

RB January 27, 2010 at 17:17

Thanks for the tutorial. The before and after pics are great.

Best,
RB

Reply

cherie January 27, 2010 at 20:44

Thanks for this info. We’re looking forward to more on the subject, please keep’em coming!

Reply

Diane@2stews January 29, 2010 at 12:46

Thank you, thank you for taking the time to post this for us. When even the daylight in winter is like night, this is so helpful. Thanks again for sharing the light!

Diane

Reply

Lisa January 29, 2010 at 15:51

Simone. this is so invaluable to me, you have no idea. I have two Lowel Ego lights and two Lowel Ego light bulbs in lamps, yet I still have problems getting a nice, daylight bright photo in proper color. It’s so dark in my place, due to the lack of windows, so that no doubt plays a role. RAW actually scares me..but everyone has told me learning it would improve my super low light photos greatly. Thanks so much for posting this!! Bookmarked,

Reply

Mathea January 29, 2010 at 21:05

The side-by-side photos were extremely helpful to me! I have to take most of my photos at night!

Reply

Alyssa January 30, 2010 at 02:32

I was just wondering what camera and lens you are working with? I love how close you are getting. Would it happen to be a 100 mm macro? Thanks again for your posts they are so so helpful for those just learning!

Reply

Simone (junglefrog) January 30, 2010 at 08:32

He Alyssa! Very well spotted. Those are indeed made with a 100mm 2.8 macro lens. The camera I use is a Canon 5D Mark II.

Reply

Cristina January 30, 2010 at 08:48

Thanks for all your tips, Junglefrog !!! I started my blog two months ago, and I’m having trouble taking pics in the non existant light in paris at this moment !!!! I read your advice very carefully, although for someone almost photo illiterate as me….well, many questions remain.
I love your blog too, AND your cats !!
Take care,
Cristina

Reply

Zorana April 15, 2010 at 01:44

Great tutorial, thank you!

I have a question- how effective is gray card with regular attached flash?

Reply

Marian Hearne February 6, 2012 at 12:56

Great tips, will definitely try them. I tend to rely too heavily on one spot in my kitchen and at a particular time of the day.

Reply

Leave a Comment

{ 1 trackback }