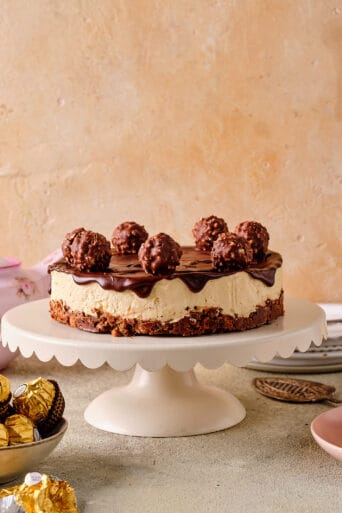
Ricotta gnocchi; Daring cooks #1!!
Ricotta gnocchi
When reading about this challenge – the very first one for the daring cooks – I was a little anxious. The recipe seemed quite complicated plus I already know that my man would really not like this. He isn’t into anything that is cheesy and ricotta with parmezan…. well, that is just asking for trouble. But ok, making another pasta dish alongside wouldn’t be too complicated…!
My first goal was to find fresh ricotta. I did find it when I was in Italy the week before I made the recipe, but I didn’t want to risk putting that in my suitcase for fear of having a ricotta coated suitcase when I would arrive back home, so I left it there and searched for it in Holland. No luck. So I bought the regular packaged ricotta and as instructed put them in a drainer with paper towels and put it in the fridge overnight. To be honest I felt it was already quite dry and didn’t expect any fluid to come out, but it did! And much more then I had thought it would so I am glad I decided not to skip this step.
Preparing the batter was easy; adding eggs, butter, salt and parmezan and it looked all good and ready to go although I was wondering how I was supposed to make anything substantial out of batter like that.
Batter for ricotta gnocchi
I had watched the very helpful video of the Zuni cafe and it all looked relatively easy if you watched the video…. Ha… not so much!
The batter is so light that scooping some out of the bowl on a tablespoon and pushing it – gently – into the flour sounds easy but I found it quite difficult. Well, maybe difficult is not the right word, but it’s not easy to keep the sizes consistent. In the recipe they said to carefully pick up the gnocchi and make them into an oval ball of sorts, but I didn’t think that was feasible without making the shape more terrible then it already was…
Maybe the batter was slightly too light, but when I made my test gnocchi it stayed together perfectly and the tasty was light and fluffy, so I am not sure but it all seemed quite ok. However, looking at some of the other photos of the batter that people had, mine was waaaay too soft! Maybe it was still to wet, although not much more liquid was coming out of the ricotta. I guess I will have to make it again just to see how I can improve this. Unfortunately it always seems one of the things that doesn’t happen if Tom doesn’t like it…
Although he will be gone for a few days in june, so that might be a time for me to experiment with better gnocchi!
Small blob in the flour
The sauce I prepared was simple yet tasty; I used a basic tomato sauce with zucchini, a bell pepper, garlic and some herbs I threw in topped with parmezan. It tasted good. Not spectaculair but good. It’s always hard to try and cook and shoot photos at the same time and I should have taken a photo of the kitchen afterwards as it looked like a flour explosion had taken place!
So what did I think of the recipe? I found it challenging and it was tasty, but I will have to try this again to see if I can improve on the softness of the batter to make it easier to handle. If you want to give this a try; here is the recipe!
Zuni Ricotta Gnocchi
Source: From The Zuni Café Cookbook.
Yield: Makes 40 to 48 gnocchi (serves 4 to 6)
Prep time: Step 1 will take 24 hours. Steps 2 through 4 will take approximately 1 hour.
Tips:
- If you can find it, use fresh ricotta. As Judy Rodgers advises in her recipe, there is no substitute for fresh ricotta. It may be a bit more expensive, but it’s worth it.
- Do not skip the draining step. Even if the fresh ricotta doesn’t look very wet, it is. Draining the ricotta will help your gnocchi tremendously.
- When shaping your gnocchi, resist the urge to over handle them. It’s okay if they look a bit wrinkled or if they’re not perfectly smooth.
- If you’re not freezing the gnocchi for later, cook them as soon as you can. If you let them sit around too long they may become a bit sticky.
- For the variations to the challenge recipe, please see the end of the recipe.
Equipment required:
- Sieve
- Cheesecloth or paper towels
- Large mixing bowl
- Rubber spatula
- Tablespoon
- Baking dish or baking sheet
- Wax or parchment paper
- Small pot
- Large skillet
- Large pan or pot (very wide in diameter and at least 2 inches deep)
Videos that might help:
- Judy Rodgers Gnocchi Demo
- Making fresh ricotta demo
- Making ricotta gnocchi
Zuni ricotta gnocchi
Yield: 40-48 gnocchi
Prep Time: 24 hrs (for step 1)
Cook Time: 1 hr
Total Time: 25 hrs
Ingredients:
For the gnocchi:
1 pound (454 grams/16 ounces) fresh ricotta (2 cups)
2 large cold eggs, lightly beaten
1 tablespoon (1/2 ounce) unsalted butter
2 or 3 fresh sage leaves, or a few pinches of freshly grated nutmeg, or a few pinches of chopped lemon zest (all optional)
½ ounce Parmigiano-Reggiano, grated (about ¼ cup very lightly packed)
about ¼ teaspoon salt (a little more if using kosher salt)
all-purpose flour for forming the gnocchi
For the gnocchi sauce:
8 tablespoons (227 grams/1/4 pound/4 ounces) butter, sliced
2 teaspoons water
Directions:
Step 1 (the day before you make the gnocchi): Preparing the ricotta.
If the ricotta is too wet, your gnocchi will not form properly. In her cookbook, Judy Rodgers recommends checking the ricotta’s wetness. To test the ricotta, take a teaspoon or so and place it on a paper towel. If you notice a very large ring of dampness forming around the ricotta after a minute or so, then the ricotta is too wet. To remove some of the moisture, line a sieve with cheesecloth or paper towels and place the ricotta in the sieve. Cover it and let it drain for at least 8 hours and up to 24 hours in the refrigerator. Alternatively, you can wrap the ricotta carefully in cheesecloth (2 layers) and suspend it in your refrigerator for 8 to 24 hours with a bowl underneath to catch the water that’s released. Either way, it’s recommended that you do this step the day before you plan on making the gnocchi.
Step 2 (the day you plan on eating the gnocchi): Making the gnocchi dough.
To make great gnocchi, the ricotta has to be fairly smooth. Place the drained ricotta in a large bowl and mash it as best as you can with a rubber spatula or a large spoon (it’s best to use a utensil with some flexibility here). As you mash the ricotta, if you noticed that you can still see curds, then press the ricotta through a strainer to smooth it out as much as possible.
Add the lightly beaten eggs to the mashed ricotta.
Melt the tablespoon of butter. As it melts, add in the sage if you’re using it. If not, just melt the butter and add it to the ricotta mixture.
Add in any flavouring that you’re using (i.e., nutmeg, lemon zest, etc.). If you’re not using any particular flavouring, that’s fine.
Add the Parmigiano-Reggiano and the salt.
Beat all the ingredients together very well. You should end up with a soft and fluffy batter with no streaks (everything should be mixed in very well).
Step 3: Forming the gnocchi.
Fill a small pot with water and bring to a boil. When it boils, salt the water generously and keep it at a simmer. You will use this water to test the first gnocchi that you make to ensure that it holds together and that your gnocchi batter isn’t too damp.
In a large, shallow baking dish or on a sheet pan, make a bed of all-purpose flour that’s ½ an inch deep.
With a spatula, scrape the ricotta mixture away from the sides of the bowl and form a large mass in the centre of your bowl.
Using a tablespoon, scoop up about 2 to 3 teaspoons of batter and then holding the spoon at an angle, use your finger tip to gently push the ball of dough from the spoon into the bed of flour.
At this point you can either shake the dish or pan gently to ensure that the flour covers the gnocchi or use your fingers to very gently dust the gnocchi with flour. Gently pick up the gnocchi and cradle it in your hand rolling it to form it in an oval as best as you can, at no point should you squeeze it. What you’re looking for is an oval lump of sorts that’s dusted in flour and plump.
Gently place your gnocchi in the simmering water. It will sink and then bob to the top. From the time that it bobs to the surface, you want to cook the gnocchi until it’s just firm. This could take 3 to 5 minutes.
If your gnocchi begins to fall apart, this means that the ricotta cheese was probably still too wet. You can remedy this by beating a teaspoon of egg white into your gnocchi batter. If your gnocchi batter was fluffy but the sample comes out heavy, add a teaspoon of beaten egg to the batter and beat that in. Test a second gnocchi to ensure success.
Form the rest of your gnocchi. You can put 4 to 6 gnocchi in the bed of flour at a time. But don’t overcrowd your bed of flour or you may damage your gnocchi as you coat them.
Have a sheet pan ready to rest the formed gnocchi on. Line the sheet pan with wax or parchment paper and dust it with flour.
You can cook the gnocchi right away, however, Judy Rodgers recommends storing them in the refrigerator for an hour prior to cooking to allow them to firm up.
Step 4: Cooking the gnocchi.
Have a large skillet ready to go. Place the butter and water for the sauce in the skillet and set aside.
In the largest pan or pot that you have (make sure it’s wide), bring at least 2 quarts of water to a boil (you can use as much as 3 quarts of water if your pot permits). You need a wide pot or pan so that your gnocchi won’t bump into each other and damage each other.
Once the water is boiling, salt it generously.
Drop the gnocchi into the water one by one. Once they float to the top, cook them for 3 to 5 minutes (as in the case with the test gnocchi).
When the gnocchi float to the top, you can start your sauce while you wait for them to finish cooking.
Place the skillet over medium heat and melt the butter. Swirl it gently a few times as it melts. As soon as it melts and is incorporated with the water, turn off the heat. Your gnocchi should be cooked by now.
With a slotted spoon, remove the gnocchi from the boiling water and gently drop into the butter sauce. Carefully roll in the sauce until coated. Serve immediately.
Variations: For the gnocchi, you can flavour them however you wish. If you want to experiment by adding something to your gnocchi (i.e., caramelized onion, sundried tomato), feel free to do so. However, be forewarned, ricotta gnocchi are delicate and may not take well to elaborate additions. For the sauce, this is your chance to go nuts. Enjoy yourselves. Surprise us!!!
Freezing the gnocchi: If you don’t want to cook your gnocchi right away or if you don’t want to cook all of them, you can make them and freeze them. Once they are formed and resting on the flour-dusted, lined tray, place them uncovered in the freezer. Leave them for several hours to freeze. Once frozen, place them in a plastic bag. Remove the air and seal the bag. Return to the freezer. To cook frozen gnocchi, remove them from the bag and place individually on a plate or on a tray. Place in the refrigerator to thaw completely. Cook as directed for fresh gnocchi.
Recipe from the Zuni cafe cookbook


Appetizer
Asian
Bread
Breakfast
Desserts & other sweets
Healthy
Great post yes I did home-made ricotta and it was bone dry and this makes the shaping easier and the texture more firm. I agree with you they are cloud-like and tasty but not the best looking dish. I really liked the fried version they sort of turned out like mini-pancakes in taste and texture. I did add about 2 tablespoons of self-raising flour into the batter which helped alot with the frying. Looking at your batter it appears very thin mine was a lot firmer good job on shaping the gnocchi from such thin batter. I really like the very white gnocchi you got. Thanks for the very nice comments on my blog.
[Reply]
Simone (junglefrog) — May 14th, 2009 at 08:28
Thanks Audax! Yes, I think adding some more flour would probably have helped the very thin batter. I wasn’t sure what the right consistency should be and since they didn’t fall apart I thought they should be ok.
[Reply]
Simone, your gnocchi look just like Zuni’s as they just drop and roll, which is probably the best way, and that sauce, OMG – not to mention (yet again), the gorgeous photos! I’ll never have your photo skills, but please god, give me some natural light- and maybe a macro lens? lol
Also, thank you so much for the kind thoughts, as I need as many as I can get right now
[Reply]
Simone (junglefrog) — May 14th, 2009 at 08:31
Lisa… don’t tell me you don’t have daylight where you live? lol… Thanks for the compliments although I don’t really think it looks that good to be honest…
[Reply]
I make so many things myself, yet gnocchi, either ricotta or potato, have always been a disaster. However, I like them so much that I should try again soon! You can make your own fresh ricotta you know…
[Reply]
Simone (junglefrog) — May 14th, 2009 at 08:27
I have heard that you can make your own ricotta yes… I just didn’t know that before making them! I would like to make my own ricotta. As long as I don’t have to make my own ricotta gnocchi again…
[Reply]
Wow,….Simone: your ricotta gnocchi look gabulous!! That sauce looks simple yet so tasty!! MMMMMMM….Great job you did!
[Reply]
You should be proud Simone! These aren’t the easiest things to prepare…they’re a pain in the you know where…BUT they do have a delicate, pillowy taste. Personally, I would stick with a burnt butter sauce with these (just my preference). A great job!
[Reply]
After reading The Daring Cooks thread and noticing that many people had problems with shaping the gnocchi, I decided to put the batter in the fridge for a half an hour. I think it was a good call as I had absolutely no trouble with shaping them.
I love your sauce. I think mine was missing a tomato in it
[Reply]
Yours look quite lovely. I too found it was really light and easy to roll and my test gnocchi held together thank goodness!
[Reply]
Mmm, your gnocchi look amazing!! I love the sauce that you used =D.
[Reply]
wooo hoo you did it! Congrats!
Don’t be afraid of making potato ones. I know I said they are more complicated, but totally worth it. I might try sweet potato ones next.
[Reply]
Great photography! The fresh veggies you used in your sauce makes it look 10000x yummier!
[Reply]
It looks like your did great! Your Gnocchi look very delicious and the brightness in your photos make it look very inviting. Mine were a lot softer then it seems most people’s were too… and I made my own Ricotta and there was absolutely no more liquid coming out at all. They held together fine but they felt like if you fiddled with them too much they would just fall apart. So you are not alone!
[Reply]
What beautiful photography! The Zuni recipe was more delicate than the ones I usually use so they were a challenge for me also. I added sweet potato to my batter which helped firm them up a little. Your sauce looks delicious.
[Reply]
Gnocchi is on my list of things I’d love to try and make, but I’ve been afraid to attempt it. They look so delicious, I’m going to have to overcome my fears!
[Reply]
I love your blog and the banner! The gnocchi photo is stunning. Congratulations on such a beautiful creation!
[Reply]
Lovely photos. My results were so ugly I was afraid to post. Nice job.
[Reply]
Simone! Thanks for visiting my blog
Your page is quite lovely and your gnocchi look beautiful!
[Reply]
Mine were really soft too. I think maybe adding some flour to the mix may help. The sauce you made does sound good.
[Reply]
Great post Simone! I still think that they look great, very rustic! I was thinking that after seeing everyone’s… maybe my batter was too thick. Oh jeez, now we are acting like goldielocks! Atleast you watched the video, I don’t know how I missed that.
[Reply]
Your gnocchi came out beautifully! And with the zucchini and bell peppers, yum! I can’t wait til summer when I can get fresh zucchini!
[Reply]
Looks like you and I had similar problems with this challenge: a spouse/partner who dislikes ricotta, and a batter that seemed too soft in retrospect. But your dish looks really good, regardless, and I really like the fact that you made a sauce with vegetable chunks: it must have added texture. Good job!
[Reply]
Well done on the first DC challenge. Your gnocchi sure look good…I barely got a handful to click. Yes, cooking & clicking with food like mine that didn’t oblige adds to the challenge! Love the refreshing feel of your blog!
[Reply]
This is not easy to make, well done. Beautiful pictures!
[Reply]
This looks really tasty and healthy too!!
[Reply]
Oh man these look amazing! I love gnocchi!!!
[Reply]