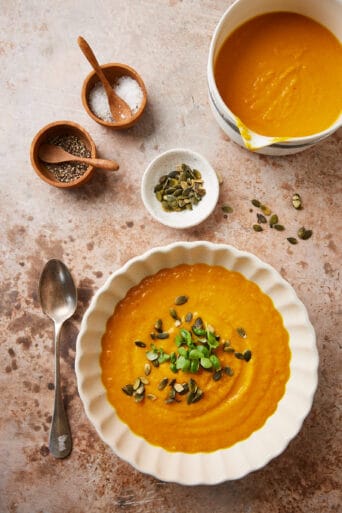
Basic chevre (sort of) for Cheesepalooza #2

After the very successful ricotta making of last month, I figured it would be a hit and run again for this month’s chevre or goatcheese. They’re pretty similar in structure I thought so what could go wrong?

Well…. you can start by getting the wrong milk. That’s one thing that can go wrong! You see, instead of me going to a proper goatfarm and buying a bottle of raw goat’s milk I searched on the internet on where to find goatmilk and voila, turns out they have it at our local supermarket. So why drive across the country when you can just walk to the store. Right? WRONG!

Hanging after 24 hrs!

The recipe of Mary Karlin states to use C20G mesophilic starter for adding to the goatcheese but I couldn’t find that, so I opted to go for the recipe by Valerie which uses buttermilk and rennet.

Now the first part of the process went quite good. I heated the milk according to instructions and left it in the oven (not turned on) for 12 hrs. It was a bit mass after that time and I dumped it into a colander lined with cheesecloth. I was all excited by that point and convinced I would have a perfect chevre the next day.

Still very wet!

So far so good. (As I later learned from Ian, I should have broken up the curds before putting it in the colander to start the draining process.)

According to Valerie’s recipe the chevre should be about done after 6 hours, so since I had left it overnight I figured it would be fine in the morning so I checked… Mmm, it still had the consistency of yogurt. Not looking like cheese at all! At that point I started to wonder if I had maybe used too much fabric for the cheesecloth, so I poured (it was that liquid still) the curds into another cheesecloth and put it back in the fridge.

After more then 48 hrs

I then contacted Valerie and told her of my attempt. The first thing she told me was to get it out of the fridge and to properly hang it. Mine had not been hanging at that point except for maybe a few hours. So I took it out of the fridge and hung it on the kitchen counter. Every half day I would open the thing, peer inside and give it a little stir, which usually meant there was more whey coming out. And then left it hanging again.

I started to think it would never come together as it kept being really liquid and then yesterday by the end of the day I was starting to get a few bits and pieces that were a bit drier. And then this morning it was the consistency you see in the picture above! Yay! It’s by no means a perfect goatcheese but… it is quite good in taste. Which is surprising considering the milk I used.

As you can see it is still very moist and picking it up and handling it was quite a sticky business.Every time I had done some stirring when it was still hanging I also added a bit of salt in, so tasting it after, it didn’t really need much extra so I just gave it a tiny bit and then rolled it in chives , wrapped it in plastic and then set it in the fridge.

So overall I am not unhappy with this chevre. It is by no means perfect but it’s a start. I have now found a source for proper goat milk and the plan is to go there tomorrow and get a few liter raw goatmilk. Now as it turns out this farm also has workshops goatcheese making and while that is only in November, I just send them an email asking if there is still room for 2 people to join… ;) Learning from the experts would be fun!

Now on to the tasting notes

  • Appearance: very soft and creamy
  • Nose (aroma): fairly strong smell of goatcheese
  • Overall Taste: the flavor is distinctively goaty but still very soft. Based on my first tasting I had expected it to be stronger but it was actually quite mild. Still very much goatcheese but not sharp
  • Sweet to Salty: Salty
  • Mild (mellow) to Robust to Pungent (stinky): Mild
  • Mouth Feel: (gritty, sandy, chewy, greasy, gummy, etc.): Very smooth texture, not like the regular chevre or goatcheese you would get.

For the original recipe it is best to check here on Valerie’s site, but I will give you the details of how I made it with the milk I picked etc and how long it took me to make

Basic chevre

Prep Time: 30 mins

Cook Time: 55 hrs hanging time

Total Time: 55 hrs 30 min

You need for this exercise also a thermometer that is accurate. Cheesecloth. A large stainless steel pot to heat the milk in. A colander or sieve to drain the curds. String to hang the curds with.

Ingredients:

  • 2 liters Goatmilk from Albert Heijn
  • 1/8 cup buttermilk
  • 1/8 tsp liquid rennet
  • 1/8 cup water
  • 1/2 tsp salt (preferably non iodized)

Directions:

  1. Before you start take the milk out of the fridge a couple of hours before you want to start making your cheese, so that it is at roomtemperature.
  2. Pour your goatmilk into the pot, stir the buttermilk in and slowly heat to 28 C (or 80 F)
  3. Remove the pot from the heat and then add your 1/8 tsp of rennet to it. Immediately stirring in a top to bottom motion for approx. 30 seconds, then stop, cover the pot and leave it undisturbed for 12 hours inside your oven (obviously not turned on) or a warm place where it won't get jarred.
  4. After 12 hours:
  5. Check your curd. it will look like custard with a clear separation between the curds and whey around the side of the pot. You can see a clean break when tested with a knife.
  6. Prepare the sieve by covering it with layers of cheese cloth, keeping in mind it needs to be large enough to hang later.
  7. Ladle the curd into the sieve to allow the whey to drain. Make sure to cut up the curd as you go along and do not pour it all in without cutting it as that would not get you the best results.
  8. Leave the curds outside of the fridge and once the majority of the whey has drained of in the sieve, hang the cheese in a convenient spot that is not too warm but not too cold either.
  9. With the highly pasteurized milk I used I had to hang the curds for a total of 55 hours before it started to resemble cheese. Every 6 hours or so I mixed it a bit with a spoon, added a bit of salt and hung it back again.
  10. Doing this made sure that the whey kept coming out.
  11. After the 55 hours the cheese was still very soft but could be handled. Make sure your counter top is sanitized, sprinkle some salt over the surface area or over the curds and gently mix in.
  12. Form it into a log on top of plastic wrap or use a herb mixture to roll the log in, then place the mixture on the wrap and roll it tightly and refridgerate.
  13. It will keep for a week to ten days and wrapped in herbs it will last around 2 weeks. Ofcourse if you haven't eaten it by then.. :)

The two liter of milk got me a little over 150 gr of actual cheese. I forgot to weigh it so the 150 gr was after I had eaten a little bit of it, but probably something like 170 gr.
The consistency of the cheese throughout the whole process went from a gluelike substance to a very smooth and silky goatcheese.

Recipe from Valerie Lugonja

This post is part of the Cheesepalooza challenge where we make a different kind of cheese every month. Our basis and guide for this whole process is the book Artisan cheesemaking at home By Mary Karlin. You can find all information about the challenge as well as how to join in the fun here.

    Pin It

26 Responses to “Basic chevre (sort of) for Cheesepalooza #2”

  1. #
    1
    Rosa — September 13, 2012 at 16:36

    It looks amazing and ever so luscious! Something I haven’t tried making yet…

    Cheers,

    Rosa

    [Reply]

  2. #
    2
    Jeanne @ CookSister! — September 13, 2012 at 17:04

    I take my hat off to you!! Cheesemaking is far too daunting for me (and besides Nick would probably decide that the hanging cheese was “off” and chuck it out while I wasn’t looking! Your finished product looks fab, despite the trials and tribulations!

    [Reply]

    • Simone (junglefrog) — September 13th, 2012 at 17:35

      Well I can assure you that Tom was not too impressed with cheese hanging there for two days.. Not being a big cheesefan either, I am sure he had to hold his nose eveyr once in a while!

      [Reply]

  3. #
    3
    christine @ wannafoodie — September 13, 2012 at 17:46

    I am currently hanging some sort of attempt at goat cheese….. I thought I started strong yesterday but ran to my pot this morning to find a barely curdled mass of runny yogurt. I opted to heat some more and see what happened. There was some curdling but I think I’ve managed to make a goat milk ricotta as opposed to anything resembling a basic chevre. It may be time for another trip to the market, a deep breath, and another attempt. We shall see. (Is it bad to say that the mixed results of other people is somewhat encouraging? As though -success or failure- we’re in this together?)

    [Reply]

    • Simone (junglefrog) — September 13th, 2012 at 21:53

      How long did you leave it to hang Christine? It sounds like you had the same thing as me… Patience in this case will do the trick eventually. Mine had to hang for about 55 hrs! And yes it’s always good to learn from other peoples failure too! We can do it!! I found the real goat cheese today so doing attempt two tomorrow!

      [Reply]

      • christine @ wannafoodie — September 30th, 2012 at 19:48

        Missed this reply! I let it hang for probably 24+ hours before losing all patience with the escapade. It looks similar to your cheese… kinda cream cheesy but certainly nothing like goat cheese. I made my second attempt last weekend and opted for buttermilk as the coagulant, which was infinitely more successful. I’d probably go that route again as opposed to the aroma b one but maybe a few more attempts at cheese will push me to give that particular recipe another go.

        • Simone (junglefrog) — September 30th, 2012 at 23:36

          Yeah I’m guessing the 24 hours wouldn’t have done the trick and I can see how you would lose patience! I know I almost did. I was just curious to see if anything would come out so I let it hang… And hey, practice makes perfect right?

  4. #
    4
    Sue/the view from great island — September 13, 2012 at 21:35

    I’m so glad you posted this—I love making cheese and I was just about to start experimenting with goat cheese. I would have done the same thing since they have goat’s milk at our supermarket now. I’m super bummed, though, because I just moved from an area in New Hampshire where there were goat farms all over the place. Now here in Los Angeles I’ll have a tough time finding the right milk!
    I think I’m going to try it your way even though you say it’s not perfect. It looks so creamy and delicious!

    [Reply]

    • Simone (junglefrog) — September 13th, 2012 at 21:55

      O let me know how it went ok? And no it’s not perfect but it is definitely delicious so nothing wrong with that. Had some more today.. ;) I’m gonna make it tomorrow with raw goat milk. See how that turns out!

      [Reply]

  5. #
    5
    Moya — September 13, 2012 at 22:18

    It really is fun and a challenge making cheese and this year I attended a cheese making day run by an artisan cheese maker when I was in Ireland for a visit, it was such a wonderful day and one that I will always cherish. Your cheese looks so delicious and I love goats cheese! I hope you manage to attend the cheese making day in November! :)

    [Reply]

    • Simone (junglefrog) — September 14th, 2012 at 07:12

      Unfortunately the workshop I picked is already full in November so I’ll have to find somewhere else but would love to do a day like you did… Making more goat cheese today!

      [Reply]

  6. #
    6
    Sami — September 14, 2012 at 12:02

    Living east of Cleveland I am wondering how I find farms that will sell goat milk. I would like to do it with fresh goat milk but understand it is against the law to sell unprocessed milk to anyone. IF I buy a goat or sheep I can have milk from my animal but not sure how to go about that AND how much would that cost? Anyone have experience finding farms that sell milk?
    Thanks,

    [Reply]

    • Simone (junglefrog) — September 14th, 2012 at 15:22

      I am not sure how the situation is in Cleveland but we can actually buy unprocessed milk here in the Netherlands. Not sure if buying your own goat is a good option, although you would ofcourse always have plenty of fresh milk.. ;)
      You can still use pasteurized goatmilk if that is easier to find? I used highly pasteurized or ultra pasteurized which caused the issues I had. I hope you manage to find the goat milk and if might be a good idea to post a comment on the Cheesepalooza website so they can help you further!

      [Reply]

    • Denise @WholemadeGoodness — October 7th, 2012 at 22:13

      Sami — it looks like you are allowed to buy raw milk in Ohio as a “cow share” or “goat share”, meaning you own a share of the animal and get milk in return. That is how we’re able to do it here in Virginia. You can try finding sources through the realmilk.com website here: http://www.realmilk.com/where07.html#oh.

      [Reply]

  7. #
    7
    El Oso con Botas — September 14, 2012 at 22:18

    I’ve been having a special interest in making home cheese since few years ago. Thank you very much indeed for sharing your recipe. I’will be soon practicing it for sure.

    [Reply]

  8. #
    8
    Stephanie — September 15, 2012 at 00:40

    I bought goats milk from the store (different brand though) and now I’m nervous to make my cheese! However, we did find the C20G mesophilic starter so maybe that will help.

    You cheese looks really yummy all rolled up in the chives. great work!

    [Reply]

    • Simone (junglefrog) — September 15th, 2012 at 07:16

      My second batch of goat cheese has just been made and I can tell you that it’s all about the kind of milk. I’ve used raw milk for the second attempt and cannot believe the difference!

      [Reply]

  9. #
    9
    A Canadian Foodie — September 16, 2012 at 03:41

    I am so so happy to hear you have experienced greater success with your fresh milk, Simone! The first batch I hung for just 6 hours, but I had trouble with Mary’s recipe and hung it for countless hours. The idea is to hang it for up to 6 hours and you will have a milk, velvety mass of creamy wonder. The longer out of the fridge, the stronger the flavour… I am sure you have figured all that out by now – and the fridge definitely haults the dripping process!
    What an experience! Next time, we will connect faster, as we do try to keep a few steps ahead of each challenge cheese and have made them several times, usually – by the time they are “up” to enable support! Though, you have complete empathy as I have had some really hair curdling experiences, too! But, love the fun! Am making halloumi today after making it at Smoky Valley last weekend to compare the two. Theirs is delicious, but very hard. Mine is just finished the second press and I will do the heating in the brine tomorrow. Another gal in our group is coming over to make ricotta. She is A_F_R_A_I_D and once we get her over the hump, am sure she will be as cheezy as the rest of us.
    OX
    V :)
    V

    [Reply]

  10. #
    10
    Robin O — September 16, 2012 at 07:36

    Cheese making has been on my mind too lately, but I’ve yet to brave the experience. You are encouraging me. So many cook-a-longs so little time ;-) Beautiful and tasty effort!

    [Reply]

  11. #
    11
    Nic@diningwithastud — September 21, 2012 at 05:54

    I’m SO enjoying your cheese adventures :) It looks deliciously creamy

    [Reply]

Trackbacks/Pingbacks

  1. Pingback: Homemade Goat Cheese | Cooking Pics

  2. Pingback: Junglefrog Cooking » Basic chevre take #2 with raw milk

  3. Pingback: Basic Chèvre: Cheesepalooza Challenge Two Round Up - Valerie Lugonja is ....

Leave a Comment